 Sometimes I’m a little slow. In that, I had never really spent much time browsing around Etsy.
Not even after I opened my own store there. Or a second one.
I had only looked at shops that sold things similar to what I was selling, so I could get ideas and not look like a total nincompoop. (Do people even say that word anymore?)
Anyway, Etsy is its own little, or big, world. It’s going to take me eons to learn my way around, I’m afraid, but I’m trying. Someone suggested I should make Treasuries, collections of favorite items.
I’m still working on that but it did get me browsing more than I had in the past. Oh boy, if you think Pinterest is a huge time-drain, Etsy is even worse . . . because you can buy anything you like!
Unless, of course, you’re like me when you see something cute and say, I think I can make that.
Which is how these Tea Lights came to be. Some sellers call them Moroccan Tea Lights if you want to do an Etsy search and see the ‘real’ thing. Total works of art!
I instantly fell in love. Well, not so much that I’d pay for one and not so much that I’d spend the time it’d take to get my jars to look like theirs.
So maybe I just fell in ‘like’.
The cool thing is, they’re really easy to make and don’t take a ton of supplies.
Supply List
- Clean jar
- Glass paint or Mod Podge (you can tint Mod Podge with food coloring and get a pretty result.)
- Multi surface metallic paint
- paint brush
- fine tip pour spout
- patience
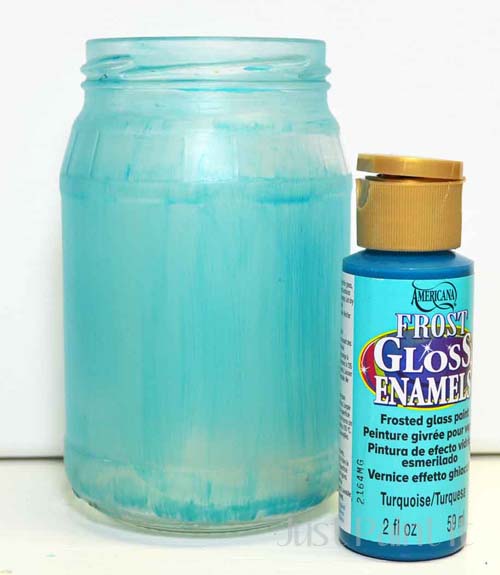
First let’s talk about painting your jar. I used a frost paint because I wasn’t really sure what I was going to do and I just wanted to see what frost looked like.
(Actually, I was going for a sea glass effect and then found the Moroccan tea lights on Etsy and decided to try that instead.)

If you don’t want a frosted look, you could use other glass paint that is translucent. Or you could use Mod Podge Sheer Colors like I used on these jars, or just tint your own Mod Podge with food coloring. I haven’t tried that yet but I’d like to try some amber glass for Fall.

No matter which paint you use, you’ll need the same thing for every kind . . . patience. A big ol’ healthy dose too.
It takes coat after coat after coat to get any depth of color on glass. So I had these guys sitting on my worktable all day while I was painting other stuff, throwing on a coat, then back to painting something else.
I’d say I painted about 4-5 coats on the turquoise jar. The green only took a couple for some reason.
Plus the green didn’t have visible streaks like the turquoise. Go figure. Same paint, same brush, same day, same painter! Different look. pffttt.

I will say that the glass paint dries very fast so that’s a plus in that it doesn’t take a ton of time, other than so many coats.
Now for the fun part. There are different ways to “dip-dot” the paint – like the end of a paintbrush – but I like the fine tip caps that fit on top of Martha Stewart paints. Since MS paints are multi-surface, this was the perfect combo for this craft.
Just screw the tip onto the paint bottle, tip it upside down and give it a couple of shakes to get the paint into the tip.
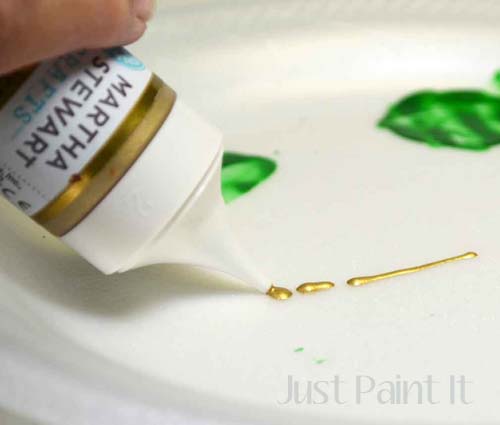
And then practice. Even though you’ll mainly be doing simple dots, you still want to get the feel for how hard to squeeze the bottle, whether to drag the bottle against the jar or hold the tip away from the bottle. Stuff like that.
It’s easy though and it doesn’t take long before you get the hang of it.
Then start dotting!
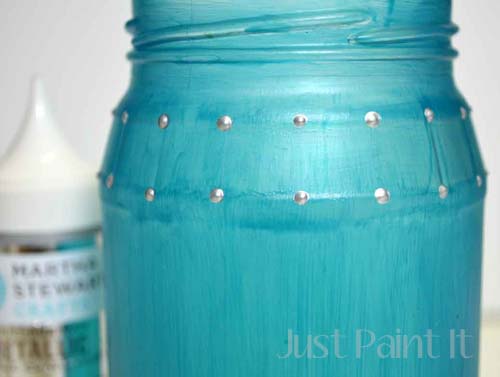
I had no design or plan when I started. I did the first row of dots all the way around and then the second row.
I did sneak a peek at one of the Etsy shops and then groaned, realizing there was no way I was going to create one of their masterpieces in an afternoon.
Instead I just did my own thing and kept adding dots.

Eventually I wound up with this. It looks a lot fancier than it really is.
No kidding, once you get to dotting, you just keep going and going and going. It’s fun and relaxing in a meditative sort of way.

For the green jar I tried doing a pattern in the beginning, then carried that pattern around the jar and then kept going and put some more designs on the bottom.
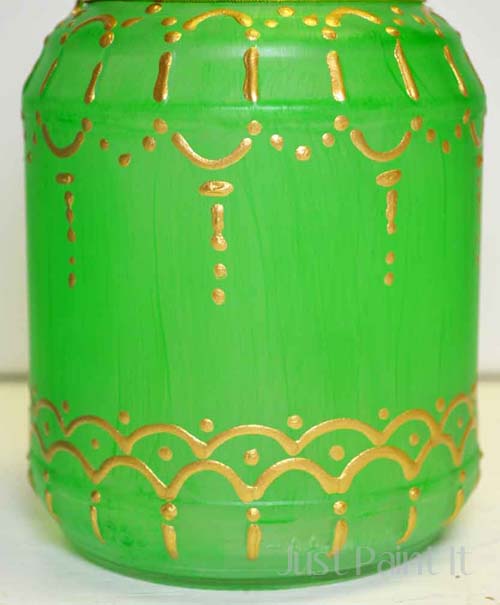
Whoohoo, scallops! ha ha. The toughest thing about this was I had to wait for the top to dry before I started on the bottom.
Still, very fun stuff. And the metallic paint really looks great on the glass. (Why the green looks like plastic, I have no idea. It doesn’t in person though.)
So really, that’s all there is too it . . .

. . . except I wanted to cover the rim of the jar so I dug out my beading boxes.
Yes, I have beading boxes, with loads of dust on them. A few years ago, when I moved in with Mom part-time, I needed something to stay busy. (I didn’t have my paints at her house because I didn’t want to make a mess in her brand new home and I thought all of this would be temporary. Ha!) So I bought some beading stuff, thinking I’d make some jewelry.
Why, I don’t know. I don’t even wear much jewelry other than my wedding ring and maybe some earrings. Maybe.
Still, I wound up with some pretty beads and stuff.
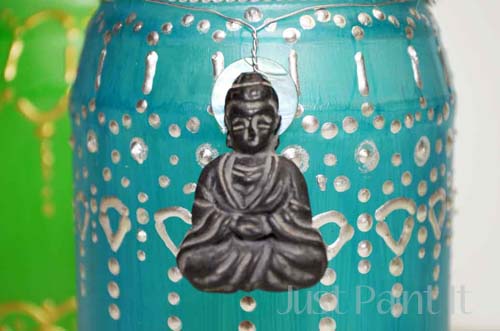
I glued a little abalone charm to the back of this little buddha guy.
Total aside: I was going to title this project “Moroccan Tea Lights” and then I realized a photo with Buddha in it just might not ‘go’ with moroccan.
Or does it? I’m so lame when it comes to World events and culture.

I wired the buddha around the jar’s mouth and covered it with some silver twine. For the green jar I found some gold stretchy ribbon from Christmas. Everything else I had was “too gold” and took away from the painted designs.
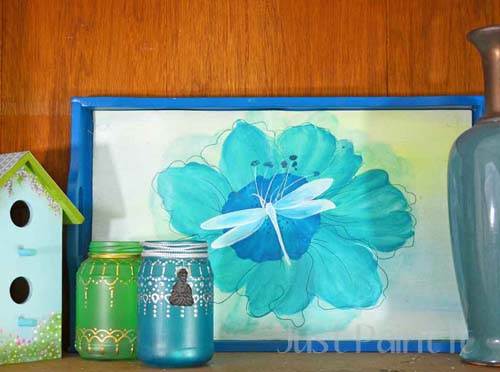
Since I used turquoise and green, the jars fit right in with my decor. But I can’t wait to try some red ones for Christmas. Wouldn’t that be pretty? And really, they didn’t take that long either.
Oh wait! I almost totally forgot the best part!
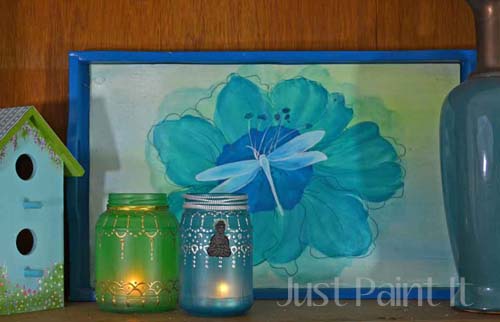
The tea lights!
The one thing that’s bothered me about this house is the lack of light in my level. Adding these little tea lights to my bookcase made a huge difference!

I wonder if they make battery operated tea lights with timers? lol.
Have you done any crafting with jars? No kidding, I absolutely love it. I think because I always have jars on hand so it’s fun to try different things on them. Here are some other jar crafts I’ve made –
Dollar Store Jars with Chalkboard Paint
Let me know what you’ve done with jars too! What are you working on right now? I’ve noticed more and more Fall and Halloween being pinned on Pinterest. You think just for ideas? Surely, no one is actually doing Fall crafts, are they? Are you?
Colleen
![]()
DecoArt Americana Frost Gloss Enamel Paint, 2-Ounce, Turquoise
Martha Stewart 32103 2-Ounce Acrylic Metallic Paint, Gold
Plaid:Craft Martha Stewart Fine Tip Tops 7/Pkg-
Plaid 3/4-Inch Craft Gold Nylon One Stroke Brush, Flat
Lily’s Home Battery operated Tealight Candles Flameless Set of 12pcs
(There are some affiliate links in the Supply List which means if a purchase is made by clicking on a link, I’ll get paid a small commission.)
Love your tea lights Colleen so pretty & a great idea just one question are they safe to use with a tea light, won’t crack with the heat ? Why I ask is I had an accident with a tea light back along !! LOL
I’ve decorated jars etc in the past but haven’t done any recently. Like you I have a stash of beads as well !! LOL
Did you get my message with my FaceBook details ? Lyn x
Good question, Lyn. I used regular tealights for about 30 minutes and they were fine but I’d recommend battery-operated ones. Just easier and safer.
I did look at your Facebook page but couldn’t see the photo. Would you mind emailing it to me, if you get a chance? muralmaker1@gmail.com.
These are so pretty! I need to get some of that gold MS paint!
Heidi, those fine tip tops work with any paint in the MS line too. So really nice for any type of ‘puff’ painting. But, yeah, the metallics are really nice. I really love the silver!
Love these jars, Colleen! I was thinking that some beaded chain would look pretty around the neck of the jar and one could paint the base to match. Or add a tiny painted garland. Oh, you got my creative juices going, as usual! Have a gorgeous week!!
Hugs, Laura
Colleen, these are lovely! I love using mason jars for parties and this would be such a great idea for creating a color scheme for holding flowers and candles!
Thanks so much, Ashley! Yes, they look really lovely with little tealights inside. I’m thinking of doing some for the holidays. The first one seems like it takes forever, but really it’s quite relaxing and doesn’t take that long.
Thanks for stopping by! xoxo