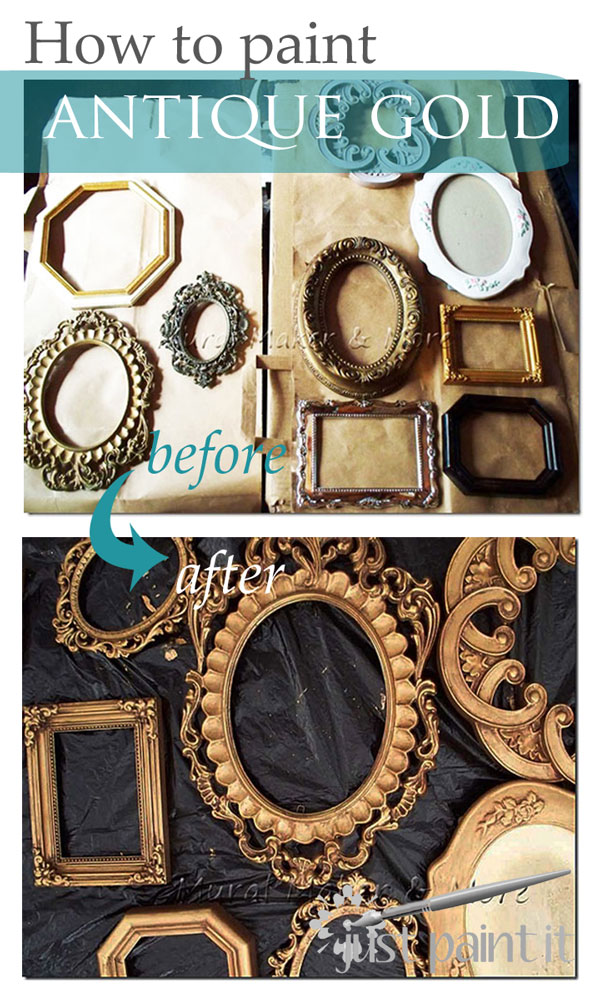
People often call me ‘creative’ however a lot of my ideas come from my custom clients. Like these gold frames. Today I’ll show you How to Paint an Antique Gold Faux Finish.

My clients wanted to add some frames like these in an antique gold finish on the wall opposite the cherry blossom tree mural. So they showed me the above pic and say they’d looked everywhere for frames that match.
I can do that for you.
‘Where are you going to find the frames’, they asked in that perfect I’m-a-shopper-not-a-DIYer tone.
Thrift Stores!
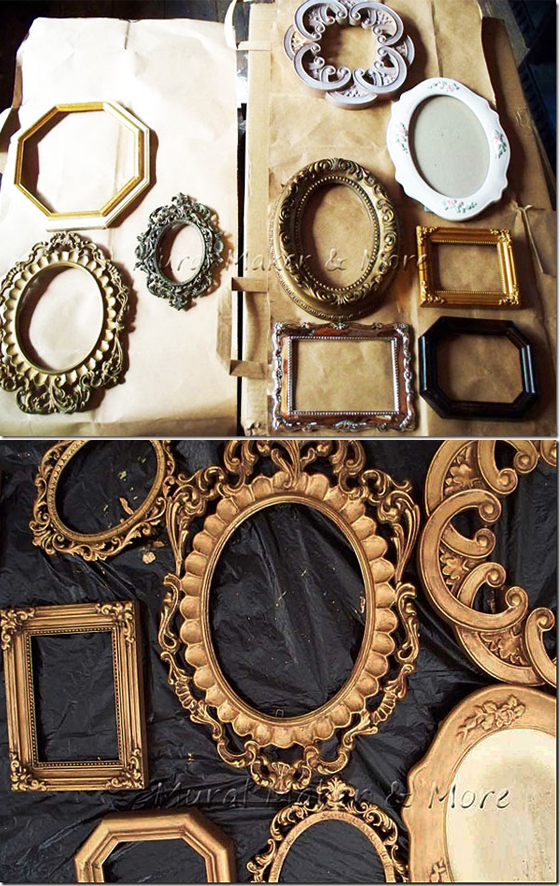
Luckily I’d painted the safari mural for these clients before, so they trust me. Even with thrift-store-turned-gorgeous-antique-gold-frames for their baby girl.

Four trips to three different thrift shops, but I scored great frames at rock-bottom prices.
Wood, ceramic, metal, plastic and foam. Yes, foam. One of the scrolled oval frames is actually compressed foam.
How to Paint an Antique Gold Faux Finish
The first step is getting a pretty gold basecoat. But, like any other colors, there are many shades of gold.

Since I wanted to match their antique gold crib, finding the right tone of gold took a few attempts.
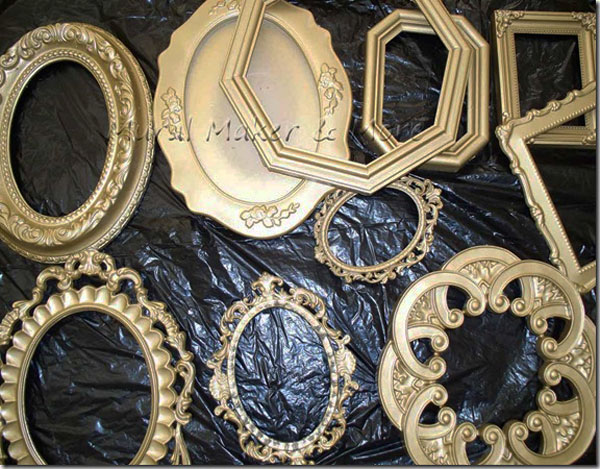
I thought I could get away with a basecoat of gold spray paint but the gold was too light and too . . . blah.
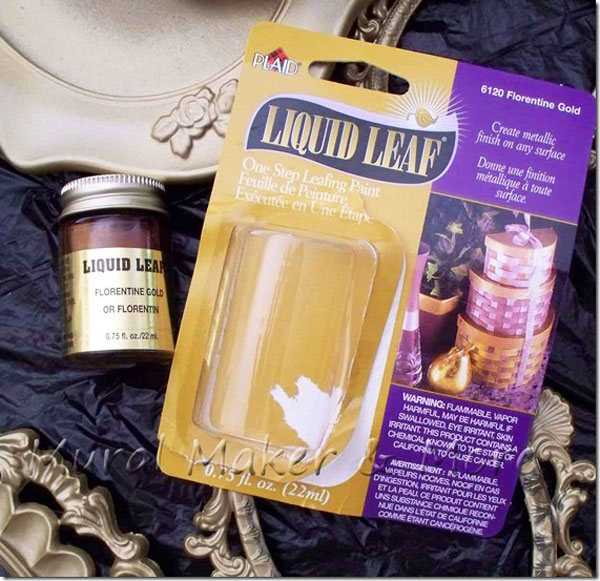
Rather than trying to find the right tone of gold in spray paint again, I grabbed a little bottle of Plaid’s Liquid Leaf. At Michael’s. With a 50% coupon.

For Liquid Leaf, you’ll need old, scruffy brushes. Which I usually have a drawer-full. Or just buy some cheapies. Because – a) you won’t want to clean them – unless you happen to have paint thinner around, and b) you need to scrub the gold into all the scrolls and crevices.

Can you see the difference in tone? I bought Florentine Gold in the Liquid Leaf but it wound up a little to bronze-ish. Pretty, but I’m trying to match their crib.
I’ve put a Supply List with links to all of the products below this post.
Step 1 – Basecoat with Glorious Gold.
After all of that trial and error I finally landed on the perfect gold. Although Liquid Leaf would work too.
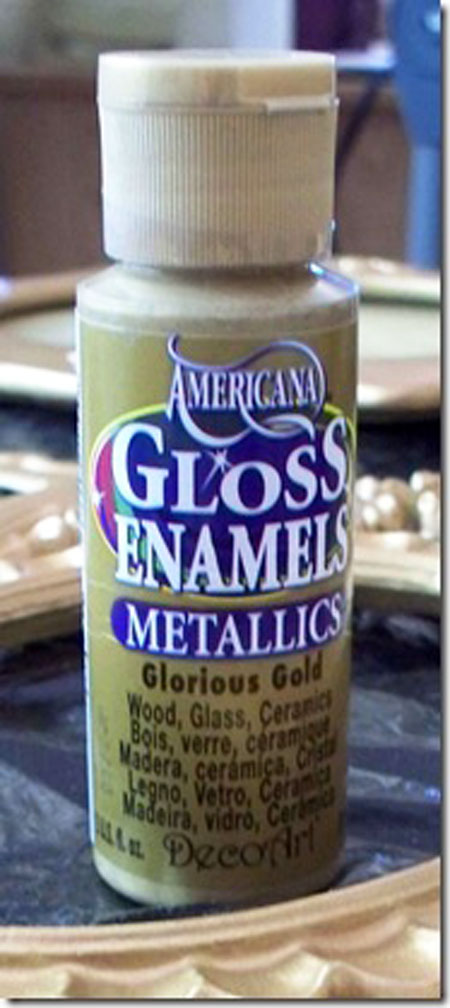
Americana Glorious Gold is the color I was going for in the first place but didn’t want to spend the time brushing it on.
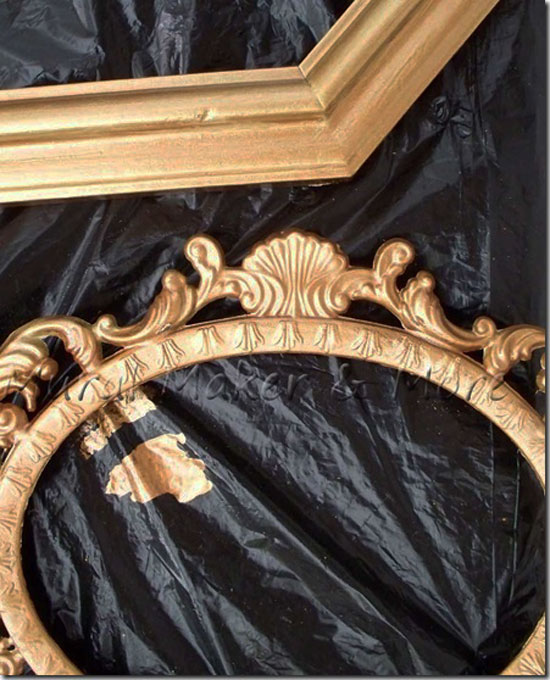
Step 2 – Apply Burnt Umber in small areas

We’re using Burnt Umber full strength, not in a glaze, so you want to work in smaller areas or it’ll dry too fast.
Step 3 – Wipe Burnt Umber off with soft towel
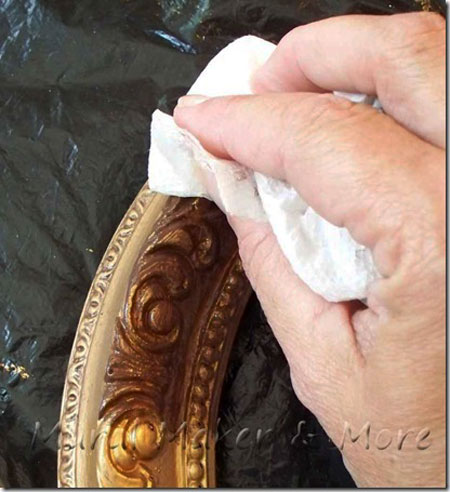
I used a paper towel but a soft rag would work also.

You’re wiping off the raised areas, allowing the brown paint to stay in the crevices.
Step 4 – Apply Floating Medium to raised areas
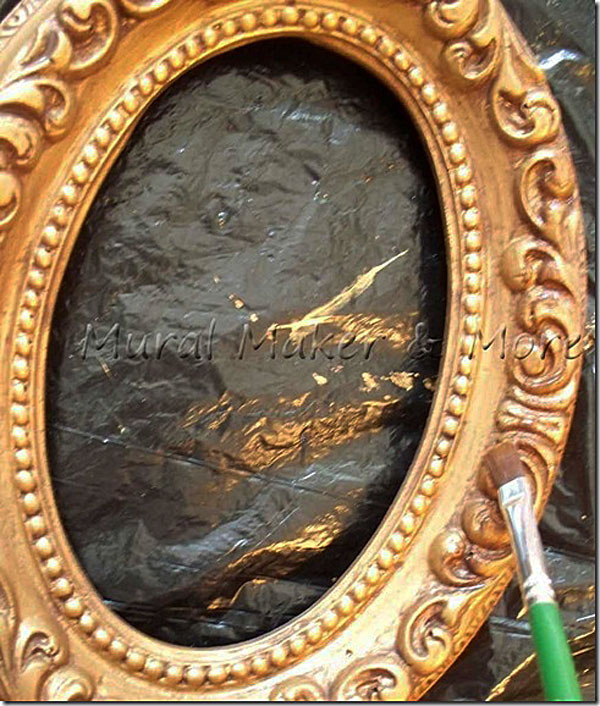
This step is to accentuate the gold on the raised areas which, in turn, accentuates the brown in the crevices.


It’s a subtle difference in the photos but in person there’s a marked difference.
Step 5 – Seal with Matte Clear Coat Spray
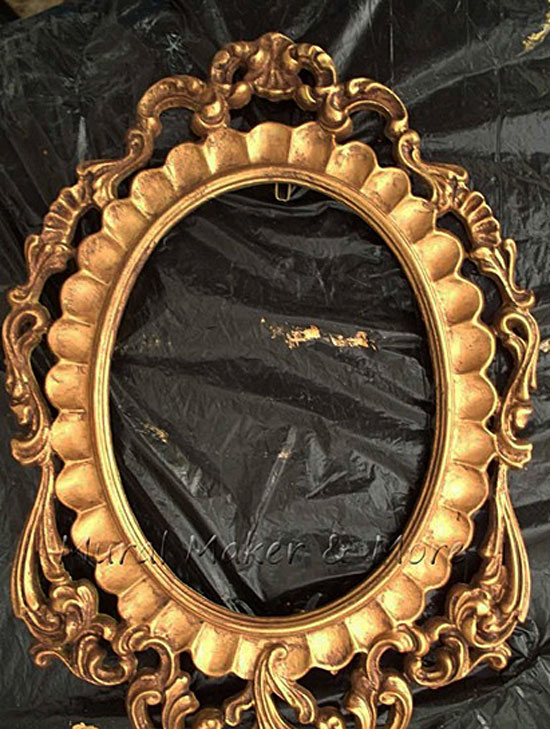
If you seal with a glossy clear coat, the finish won’t look authentic. You could use a satin, if you can find one.
That’s it! The frame in the above pic is a foam frame. No lie! It’s compressed foam but now looks like a metal frame.

This frame shows the finish the best and how the frames now all match the antique gold baby crib.
Now you know how to create an Antique Gold Faux Finish. It’ll work on items other than frames but the more detailed the better. You want to have raised areas and crevices to get the authentic look.
Let me know if you try this. I’d love to hear how it turned out!

Liquid Leaf
Scruffy paint brushes
Glorious Gold paint
Burnt Umber paint
Floating Medium
Krylon Matte Spray
This is great!!!!!!!! Thank you for sharing! Do you think i would be able to use acrylic paint over metal?
Acrylic paint, by itself, over metal will most likely flake or peel off. You can either a) prime the metal and/or b) seal it after you paint with lacquer. I’ve had pretty good luck painting on metal and sealing it with lacquer, even outdoors.
Good luck!
from where I can buy the glorious gold paint, you mentioned in step 3?
You can find Americana “Glorious Gold” in most craft stores, as well as online.
Do you want the wardrobe in antique gold or just to appear antiqued over a color? There are many great tutorials for antiquing furniture. I’d also recommend Miss Mustard Seed, who specializes in painting furniture. Hope this helps.
Your picture frames look great! I am going to try this with some wood ornamental molding I am going to hang on the mantle above my fire place. I was wondering what if you could clarify what you meant by skip steps 1 & 2. Do you mean disregard using the michaels liquid leaf and the spray paint and just start with the American Glorious Gold. Also what is clear coat? Is that a specific type of spray paint?
You have no idea how much I appreciate this blog… I have researched endlessly for a tutional directing me how to tone down the classic liquid gold. So looking forward wrapping up this project.
Thanks so much, Gloria! Glad to be of help. You could also use a brown stain but I always have craft acrylics around.
I can’t remember if I wrote this in the post or not (I’ll go check in a minute) but I’d add a spray sealer to your project. Depending on how much sheen you want – matte will tone it down a bit, satin probably the best choice, or you can always do high gloss too.
Thanks again ~ Colleen
Beautiful, and thank you for the detailed instructions.
As with Delena’s question above, which sheen level of the Clear Coat is best for this application? e.g., gloss, satin, matt, or the one apparently that has no detectable sheen?
thanks!
@Delena, you could basecoat with Glorious Gold by itself but it would take quite a few coats. Spray paint or liquid gilding has better coverage but I prefer the color of Glorious Gold. So I’d still use either spray or gilding for the basecoat and then apply one coat of Glorious Gold.
@MC, I’d use a satin clearcoat sealer. Gloss might work but it might appear too shiny. Satin would give just enough sheen, but not too much.
I am really enthralled with your effort which you have so evidently perfected into this content. I have also liked that you have presented your own point of view with this topic, especially while making your points very much clear with this topic
Electroplating in pakistan
Packaging material supplier in pakistan
thank you so much for sharing this. I’ve been looking and tried the “blah gold spray paint” adding some antique color and still not there. This is exactly what I’m looking for…now if I can find it by the quart:=)
Amazing decorative ideas for antique gold frame, looking wonderful pictures of interiors as well as faux finishing techniques over gold frames i really amazed, i use to make it possible in my home to give decent look to wall.. ……
Great post! I am actually getting ready to across this information, is very helpful my friend. Also great blog here with all of the valuable information you have. Keep up the good work you are doing here. Plastic Coatings
Excellent data, important and superb plan, as part great stuff with exceptional thoughts and ideas, heaps of extraordinary data both of which I must, keep your post. For more visit-
http://www.agency-escorts-london.co.uk/.
Oxford collection picture frame lights are available in incandescent or LED styles. Battery Led Picture Light
I love what you did with these frames. And your tutorial and instructions and photos are fantastic. I am a new follower because of this one post that I found on Pinterest. I am a stager/decorater and I am going to try this finish on a shiny brass chandy in a client’s dining room. I will first paint it with “Rub-n-Buff” (have you heard of this product. Gives shiny brass that Bronze look which is so popular now) and then I’ll add with a sponge/rag etc the gold, amber & floating medium. As it is not going get handled a lot I think it will look awesome! Thanks again for helping me out.
Hugs
Mandy
Thanks for this post! I am using the technique to improve a large bright garish gold mirror. I have a question: Should I be using the floating medium while the rest of the paint is wet or is it okay to wait till its dry?
Hi Teresa, you can try it both ways but I think using the Floating Medium while the burnt umber is a little wet will give you the best results. Otherwise it might look like the paint has flaked off rather than “rubbed” off in an aged way.
You can also mix the medium into the burnt umber paint, work in small areas and wipe off the high parts.
Let me know how it turns out!
~Colleen
What is floating Medium? What does it do?
Floating Medium helps keep your paint “open”, meaning it doesn’t dry as quickly, which enables you to manipulate it longer. In this case, if you didn’t use it with the burnt umber you’d run the risk of pulling up some of the gold. However, if you work in small sections and wipe off quickly, you could do without the Medium.
Hope this helps!
Colleen
Lovely Web page, Continue the great job. Appreciate it!.
HELLO…I’m following your instructions and finding them very helpful…I’m wondering how long do I wait between steps (i.e. how long for the gold leaf to dry etc). Also, you mention that floating medium helps to keep the paint open…does that mean you apply it right away after applying the umber?
Thanks
Hi Heather, sorry that wasn’t clear in the tutorial. Let the basecoat (gold) dry thoroughly. The burnt umber you’re using as a glaze so I’d work in smaller sections, add the Floating medium to the raised parts and wipe off. You could also mix the paint with the medium but you won’t get the depth you get with full strength paint, which is what I wanted.
Hope this helps. Let me know if I can help further.
Colleen
Hi Colleen! So just to clarify: In small sections at a time, the burnt umber is applied all over as a glaze. While the burnt umber is still wet, the floating medium is added to raised areas. Then, both burnt umber + floating medium are wiped off, together? (And where is it wiped from — everywhere but recesses?)
I can see that this wonderful post has been around for a while, so I appreciate any clarification! Thank you. Looking forward to trying this!
Yes, Julie! You can also mix burnt umber with floating medium to form glaze for a lighter look. Have fun!
Hello,
How long should I wait after applying the Burnt Umber to rub it off? Thanks!
Hi Char, sorry I took so long in getting back to you.
I would work in smaller sections so the burnt umber didn’t get a chance to dry. Otherwise you might lift the gold too. You can always apply more layers if you want it darker, but you can’t remove it if it’s too dark.
Were any of your frames covered in a fake gold paper – that you could almost peel off? If so, what method did you use to refinish it?
I bought a bunch of cheap hotel frames for their uniform sizes, but they are decorated in a shiny gold wallpaper-like cover!
Sorry for taking so long to answer, Maria. No, none of these frames were covered in a fake gold paper so I didn’t have that problem. There are a couple of glue removers like Goof Off and Goo Gone that might be helpful, but I don’t really know.
Let me know how they turn out, ok? Thanks!
I have 2 very large mirrors over my night stands. They have frames made of a hard plastic in white, and are very intricate.
Was thinking of using gold spray paint, since they are shiny white and won’t hold acrylic paint. Could I antique them after I spray paint and put a clear finish on them?
Hi Eva, I’m guessing you could antique over spray paint on plastic. You might try a small portion first. I’d be only concerned about the paint lifting with too much rubbing. If that happens, I’d get a spray primer or paint + primer to apply first, then your gold and antiquing. Good luck!
Your instructions are totally confusing – as to what you used and what you did not use.
Once upon a time I inherited 2 large, antiqued gold mirrors. I decided to paint one white for a more modern feel but almost instantly regretted it. I used your method of gold spray paint, gold acrylic paint, burnt umber, floating medium and satin spray sealer. I am so happy with the results! The two mirrors (1 made over twice, the other, untouched antiqued gold) look remarkably similar. The floating medium felt unnecessary to me, I wiped the brown off pretty quickly so it didn’t dry much in between. Thanks for the tutorial!
I’m so glad it worked for you. Rachael!
Thanks so much for this tutorial it was very helpful. I painted two matching mirror frames and they have turned out beautiful!
I’m so glad they turned out, Renate! I love hearing about people’s success stories. Happy holidays!
Can you also suggest us some good paints for gold wood or golden furniture?
I wish I could, Kevin. I’d check with paint stores to see what they recommend. Also check Pinterest out and see what bloggers have been using. I haven’t painted furniture in a number of years, sorry.
Spent a Sunday afternoon using this technique on several thrifted frames as well as two faux architectural pieces originally meant to look like marble. Every piece came out great!
The only thing I did differently was to mix the burnt umber craft paint with a black glaze from Folk Art called Cafe Noir. This helped to slightly darken the antique parts and give me a longer open time to apply and blend.
The Glorious Gold was the key though – it’s gold enough and bright enough to make the finished product look really authentic. Great project!
Oh, I love the idea of mixing the burnt umber with a cafe noir glaze! So glad you had fun!